Showing posts with label summer hair. Show all posts

Monday, May 27, 2013

5-strand textured braid pull-back!

Hello again, my lovelies! 

Long time, no see! I am very sorry for how long it has been since I have posted, school took over my life for the majority of the year, but I am now free for the summer! No studying for this girl (until the fall that is...)!

Anyway, the hairstyle I have chosen to start the summer off with is a pull back to get that hair out of your face in the heat, with STYLE! 

You will need a comb, a clip or some bobby pins, and an elastic hair tie.

Part your hair to one side, and on the side with the most hair take a chunk from the front, tie the rest back for now. Comb it out to get the tangles out, and then separate the hair into 5 pieces (3 small and 2 large). I recommend the small pieces to be the middle and end pieces. 

Side part in my hair
Once you have your pieces, start braiding down the length of the strands. Start from the outside piece on the right and cross it over the next piece and under the next. Then start at the left side and cross it over the next piece and under the middle piece. Continue down the strand till there is only an inch or so left. (When braiding 5-strand braids I like to say over, under, over , under, over, under, over, under, etc.  to keep track of the strands I am on) Once I reach the end of the braid I tie it off with the elastic and start to tug on the outside of the large pieces of hair to soften the braid and create a textured braid that looks almost like waves.
Hair before tugging out the large sections of hair
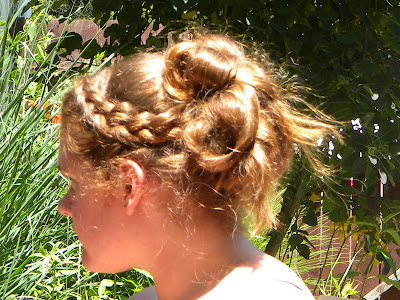
Once I get the braid how I want it, pull it back from your face, along the side of your head, and pin with either bobby pins or a clip. For this I chose a bow that I made the other day.
My lacey blue bow

The wavey five strand braid
 I didn't exaggerate the waves as much as you can; however, I like the way it looks simple from a distance, but more complex closer up.
Close up of the braid to see the details

I hope that you enjoyed this tutorial! Please let me know if you have comments, questions, ideas on how to change it, or if you try it yourself.

<3 <3 <3


Thursday, August 23, 2012

Not your mothers pony-tail

Hello my lovelies!

I have a quick and easy way to spice up your ponytail to make it a little more put-together looking and not like you just ran out of the house!

All you need are bobby pins, a comb/brush, and a couple hair elastics. 

To begin with, comb out your hair. Then you are going to separate out pieces of hair from your temples back. Take those pieces and pin out of your way for the moment.

Take all the loose hair that you have left unpinned, and brush into a high ponytail. Unpin the front pieces and wet them down, or just comb it out. Then separate out the front of each piece and start braiding straight back towards the ponytail, only adding hair to the bottom. Keep it high to that it covers the part as well as you can. Tie off the braid when it reaches the pony with a hair elastic. Repeat on the other side.

Use the two braids you just created to wrap around the ponytail holder and pin the ends below the ponytail. 

That's it! You are now done with your hair and ready to start your day! Perfect for school, work, a casual date or a night out!

The look from behind

The look from the side

Let me know if you have questions, comments, or try this hairstyle on yourself!

<3

Wednesday, August 22, 2012

Rosette hair and the arcade

Hi lovelies!

I had a date yesterday with my darling boyfriend and we went to the arcade to play skee-ball (my favorite!) and got pinkberry and bubble tea! It was a really sweet date, and I took a couple pictures for you guys, and then I have a really easy hair tutorial for you to try out!  It is the perfect look for a date that you want your hair out of your face for, or if you just want to look cute for work/school!

The boyfriend was trying to play pinball...but there was a child that was just watching us...


We won a bunch of tickets!
Now on to the hair! All you need are, as usual, a comb/brush, and some bobby pins, and if you like a head band!

Comb out your hair, pulling it straight back from your face. Then you are going to take pieces of hair from by your face and twist it around two fingers until tight with the back or your head. Pin the curl down flat with as many bobby pins as you need Make three of these curls, alternating what side of your head you are taking hair from, and pin them closely together.

You could stop now and leave your hair as-is. Or you could add a cute headband, ribbon, or clip to add a little more pizzazz to your hair! 

The front view of the look

The back view of my hair

The side view


The rosettes that I placed in the back could be placed anywhere else you like to achieve different looks! Another thing to note is that if you sleep with them in you will have little ringlets for a second day look! (If you want the ringlets I would suggest doing a whole bunch to curl your hair with 0 heat)

If you need anything clarified, try it out on yourself, or have any comments I would love to hear them!

<3

Sunday, August 19, 2012

Salmon Cakes and a Braid Bun for Date Night

Hello my lovelies!

I recently had a date night with my boyfriend of 4 1/2 years that I made dinner for. I made Salmon Cakes and a mixed green salad with balsamic vinaigrette. Because of this date night I have a hair style for you that is cute, but gets your hair out of your way for cooking dinner. 

My adorable boyfriend being a dork...
I made him take a normal picture...
I got the recipe for the salmon cakes from Cooks Illustrated magazine a while ago and made them for his birthday about a year ago. He really liked them so I decided it only made sense to make them again! 


The salad was super simple with a mix of greens and diced carrot and bell pepper with olive oil and balsamic vinegar. Then just tossed.


(I made him a sandwich the next day with the salmon cake and made a spicy mayo that he really seemed to like!)


Next thing is the hair! Really simple, really cute. You really need a hair tie, and a comb/brush, and a couple bobby pins or a hair clip.

As per usual, brush out your hair. Then separate out the top of your hair and pull it straight back and pin to your head. 

Take the rest of your hair and braid it straight down in either a normal or reverse braid.  Once braided all the way down, take the braid and roll it up and tie into a bun when it is tight to your head.  


Ta-da! You are done! 

Let me know if you have any questions, comments, or try it on yourself let me know!

<3

Wednesday, August 8, 2012

A Summer Baby Shower and French Twist Ponytail


Well hello my lovelies!

I recently went to my friends baby shower for a baby boy that is due in September. The mommy- and daddy-to-be are naming him Asher, and they have an adorable nursery with an exotic animal theme. There are monkeys and lions and giraffes and elephants and hippos everywhere! 

Anyway, I took a couple of pictures of her opening gifts at the baby shower, and one of our other friends is taking notes on what is from whom for writing thank you notes later. So I will give you a couple pictures of that before I give you the hair style that I created to keep cool in the hall the baby shower was in.


Opening the presents!
The TINIEST shoes I have ever seen!


Little bibs that I made! (There is an apple, carrot, and corn.)
Itty bitty sunglasses!

Now on to the french twist ponytail! All you need is a comb/brush and a ponytail holder!

So, as per usual, brush (or comb) our your hair to make sure you do not run into any snarls when doing this hair style! 

Once your hair is combed out section out a chunk of hair at the top of your head and split it into two pieces. Take the two pieces and cross one over the other, then cross again to make a full twist. Add more hair into each section, and cross the hair over again, keep the hair tight. Continue adding hair as you go down, twisting the hair after each one. Once you reach the end just tie off with the ponytail holder and you are done! 

If you like you could add a cute bobby pin, ribbon around the holder or a flower pin!

The back of the hairstyle

The back again!

The hairstyle from the side
Let me know if you have any questions, comments, or let me know if you try it out on yourself!

<3 <3 <3

Tuesday, July 31, 2012

Double flip pony

Hello lovelies!


I recently did a double flip hair style that I thought I'd take a moment to share it with you! It is super simple, and appropriate for almost any occasion!

To begin with you should collect three hair ties (preferably clear elastics) and a comb (or brush) there is also an option of putting flower clips or other decorative clips into the hair style.

So, as always, comb (or brush) your hair out so it's nice and smooth.  The take your fingers and section off the top of your hair and tie it back into a loose pony tail. Take your fingers above the hair elastic and make a hole and pull the hair in the pony tail up and through that hole.

Then take a section of hair from below the first one and tie it into another low pony, incorporating the hair from the first. Then you are going to do the same thing and make a hole to flip the hair in the pony tail up and through.

Then you are going to take all the hair into the last elastic and tie it off into a tight pony tail.  At that point you are done!

...or you could embellish just a little bit more! At the last elastic you can pin in some fake flowers to the hair or some sort of other fancy pin.

...and you could also curl the hair in the pony tail ( or straighten it).

The double flipped ponytail 

<3

Saturday, July 21, 2012

Workout hair

Hello my lovelies! I am currently getting ready for the color run tomorrow. If you don't know what that is a link to look at it is right here --> http://www.youtube.com/watch?v=ZWsfHC-0d6A This is one of many videos of this really cool run, and I get to do it tomorrow! I am so excited! Anyway, as part of the getting ready process I have come up with a simple and cute hairstyle for the 5k. 


The first thing you need is hair ties and a comb (preferably rat tail) and bobby pins if you so desire. 


First thing first, as always, comb out your hair till smooth.  Once smoothed out you are going to comb it back out of your face and section the hair from the arch of one eye brow back to the back of your ear in a diagonal line. Do this to both sides from the eye brow so you have two pieces at the front of your head that are shaped like triangles. Tie the rest of your hair back for now to keep it out of the way. 
Top/front view
Take the tip of each triangle and twist, incorporate more hair as you continue twisting all the way down the hair, leading back to the top of your head. Then tie off.

Side View
Then take your hair and the twists and twist them tightly into a ballerina bun. Tie it off with a hair tie.
Back view
This is when you may want to fix the strays and bumps with bobby pins, but since I am just going to go for a run, it doesn't matter so much to me.

And that is it! Let me know if you try this out, or have questions or comments.

<3

There will be braids

Hey all!  Here's another hair style that I came up with. And knowing me, you know that there will be braids! :D


Ok, so you need a rat tail comb, small elastic hair ties, a hair tie, and bobby pins.


So, first thing first, just comb out your hair. Once it is smooth, comb it straight back and make a deep part leading from the arch of your eye brow back.  Then you are going to take a section about 3 inches back. Secure this for the moment, and pull the rest of your hair back into a high pony tail.


Then take the hair at the front and separate out a third and do a lace dutch braid all the way down. This means that you are braiding the outside pieces under and only adding hair on one side of the braid as you go. Braid this pulling it back towards the pony tail and secure when you reach the end of the hair. Separate out another third and repeat, and then do the same to the last section of hair.  
From the top
Once the front is braided you are going to separate the hair in the pony tail into fourths and braid each piece of hair all the way to the bottom. Once it is all braided you are going to do the tricky part and braid all four together in a four-stranded braid.  So, take the braid on one side and weave it under, over and under. Repeat with the next strand on the same side as the first. Keep going until the hair is at the end and secure. Then roll the hair up into a bun, and pin into place.
Hair from the back
Then you take the three front braids and braid back towards the bun that you just made. Braid all the way to the end and secure. Then wrap around the hair tie to hide it, and pin it back into place.  
Hair from the side
Voila! Elegant hair for a dinner out, date, or wedding.


Just let me know if you have any questions or need anything explained differently.


<3


Flower braid

Hello again! I am back with a new hairstyle for you to try out! It's super simple and great for a casual outing!  For this you will need a rat tail comb, bobby pins, and a hair tie.


First thing, take your hair and comb out all the tangles. When it is all smoothed out you need to take your rat tail comb and make a deep part from the arch of your eye brow back.  From that part separate a chunk of hair about 2 inches back from your hair line straight over. Pin this out of the way.


Take the rest of your hair and gather it at the back of your head. In this instance I used a hair tie and just made a messy bun, you could also make a pony tail. If you want something that looks a little sleeker, take your hair and twist it until it wraps around into a ballerina bun.
Hair from the front
Once your hair is back in a bun (or a pony tail) take the hair that you separated out and separate it into 2 pieces. Pin one of them out of the way, and braid the first one into a french or a dutch braid for a couple inches past the ear and secure at the end. Repeat with the second piece of hair. 
Hair from the side
Combine the hair and braid all the way down to the end, secure. Tug on the outside pieces of the braid to make it more voluminous and start rolling the braid into a roll from the bottom. Pin the roll onto your head with the bobby pins.

That's it! A little flower head band braid!  

Let me know if you have any comments or questions!

<3

Tuesday, July 17, 2012

Braided Mohawk Pony-tail

Hello again my lovelies! I am so sorry for it taking a while to post again, but it's been a CRAZY week at school. This week I have a hair style for you that is leaning a little on the edgy side of things.  Let's get started!

You need to a comb and a hair tie (maybe a few bobby pins to pin back stray hairs and fix bumps.) 

The first thing that you want to do is just comb out your hair to make sure that you don't have any tangles that will get in the way when you are braiding.  Once it is all smooth, comb it to the back of your head.

When pushed back you are going to want to section off your hair on the top of your head. I went from the arch of each eyebrow back.  Take that hair and keep it out, tie back the rest of your hair to keep it out of the way while you braid. 

Take the hair on the top of your head and start dutch braiding at the very front. Slowly pull in the hair from the section that you made earlier, trying to keep the braid going down the middle of your head.  

When you reach the end of the hair in the section, continue to braid for 2-4 more inches.  Tie it off if you have slippery hair and then gather up all of your hair into a high pony tail and tie off. 

This is when you are going to take bobby pins and pin back strays and any bumps that may be in you hair. 

Just as a disclaimer, I took the pictures late in the day and my hair slowly fell out of the bobby pins due to the layers. 

Top View of Braided Mohawk Pony


Side View of Braided Mohawk Pony


As usual, ask any questions that you may have!


                                                                  <3 <3 <3

Sunday, July 8, 2012

Loopy cage braid

This weeks hairstyle is a loopy looking cage braid. This is accomplished through the use of a brush/comb, bobby pins, and 2 hair elastics.

View from the back of the rib cage braid


The first thing that you do is brush out all of your hair and gather up all of your hair into a high ponytail on your head. Secure with an elastic.
Side view of the rib cage braid
Then you are going to start a french braid on the top of your ponytail. Instead of trying to pull the braid tight across, pull the strand down. Do this all the way down your head, the pieces you bring in will get longer, but this is good. Secure the braid at the bottom of your head with the second hair elastic.
Top view of the rib cage braid.
The last major step is to pick a strand of the braid that is about an inch down the braid and pull up over the first elastic holder. Pin the hair securely in place. Now, if this happened correctly, the loops of hair on the sides should loop outward, creating a rib cage type effect. If you want to add a headband or flower to jazz up the look, that is super cute. The other thing that you could do, as I did, is to take the end of the braid and pin it up under your hair and to the top of your head. This will enhance the rib cage look.                                                                                                                                                       <3


Wednesday, June 27, 2012

Braids and buns

 Hello lovelies!

Today was one of those days that is so beautiful and nice, but way too hot to leave your hair down. It was the need to get my hair out of my face and off my neck, while still trying to look cute and put together for a date later that brought me to this particular hair style.   This will really work better if you have medium to long hair, but is really easy to manage!
Side shot of the hair style.
Front/top view
Back view of the hairstyle.

If you know how to braid and have some bobby pins, hair ties, and a comb, you can do this hair style!

Start off with brushing or combing out all of your hair to untangle. While this may seem obvious, it can sometimes be forgotten and then you are likely to run into a problem somewhere in the process.

Once it is all combed out you will want to take your comb and section off your hair. Run the teeth of the comb along your scalp from ear to ear and separate out the pieces. Take the back part and tie it back out of the way for now. 

Take the front and give yourself a part. I parted my hair on the right side, right above the arch of my eyebrow. 

Once parted you will start a dutch braid. All this means is that you will take three pieces of hair for your braid right at the part and cross the pieces of hair under the middle, not over the top. As you go you will add more pieces of hair only to the section that is currently in front and continue on to the end of the section.  Do this to both sides and secure the ends for now.  

Next, pull the back part of your hair into a high pony tail, making sure that everything is smoothed out.  When smooth take the braids from the front of your head and wrap them around the pony tail holder and pin to your head.

Once that is done, starting from the top, grab pieces of hair and wrap them around two fingers till tight with your scalp, and pin into place. When you pin you will want to use two or more bobby pins just to make sure that it is secure. Cross the bobby pins in an "X" going in different directions to help them lock the curls into place. Continue this until all your hair is up. 

This is a perfect style that will get your hair out of your way, but still be appropriate for nearly any occasion that may arise in the hot months of summer.  

If you have any questions or comments, or if you try this on yourself and want to share, feel free to shoot them my way!